https://augustines.tistory.com/183
1. Spring AMQP
Spring AMQP에 대해 알아보자. Spring AMQP Spring AMQP는 AMQP 기반 메세지 솔루션의 Spring 구현체다. Spring AMQP는 메시지 송수신을 위한 템플릿을 제공한다. AMQP란? AMQP는 Advanced Message Queuing Protoc..
augustines.tistory.com
https://augustines.tistory.com/184
Spring RabbitMQ
Spring AMQP Spring AMQP Spring AMQP에 대해 알아보자. Spring AMQP Spring AMQP는 AMQP 기반 메세지 솔루션의 Spring 구현체다. Spring AMQP는 메시지 송수신을 위한 템플릿을 제공한다. AMQP란? AMQP는 Advance..
augustines.tistory.com
지금까지 RabbitMQ 를 이용한 서비스를 개발하기 위해 준비 작업을 진행했다. 이제 RabbitMQ를 이용해 메시지를 송수신하는 아주 간단한 예제를 만들어보자. 물론 Java로...
본 예제는 Pivotal 팀이 제공하는 Spring.io에서 아래 주소를 참조하여 만든 소스다.
https://spring.io/guides/gs/messaging-rabbitmq/#scratch
Messaging with RabbitMQ
this guide is designed to get you productive as quickly as possible and using the latest Spring project releases and techniques as recommended by the Spring team
spring.io
본 포스팅의 소스는 STS 3.9.5.RELEASE 에서 제작했으며, IDE 툴로 STS 어떤 버전이든 상관없으며 IntelliJ 를 써도 무방하다. 자바 버전은 JDK1.8 이상을 요구한다.
예제 소스를 만들기 전에, 반드시 이 포스팅의 앞 포스팅인 두 개를 보고 따라와야 한다. RabbitMQ Server가 설치되어 있어야 하며, Queue와 Exchange를 만들어놔야 한다.
Spring starter에서 우리가 사용할 Spring for RabbitMQ를 선택해서 프로젝트를 만들어도 무방하다.

pom.xml
먼저 pom 파일을 만들자. 아래는 이 프로젝트에서 사용하는 pom 파일이다.
<?xml version="1.0" encoding="UTF-8"?>
<project xmlns="http://maven.apache.org/POM/4.0.0" xmlns:xsi="http://www.w3.org/2001/XMLSchema-instance"
	xsi:schemaLocation="http://maven.apache.org/POM/4.0.0 https://maven.apache.org/xsd/maven-4.0.0.xsd">
	<modelVersion>4.0.0</modelVersion>
	<parent>
		<groupId>org.springframework.boot</groupId>
		<artifactId>spring-boot-starter-parent</artifactId>
		<version>2.2.4.RELEASE</version>
		<relativePath/> <!-- lookup parent from repository -->
	</parent>
	<groupId>com.augustine.spring.rabbit</groupId>
	<artifactId>spring_rabbit</artifactId>
	<version>0.0.1-SNAPSHOT</version>
	<packaging>war</packaging>
	<name>spring_rabbit</name>
	<description>rest server</description>

	<properties>
		<java.version>1.8</java.version>
	</properties>

    <dependencies>
        <dependency>
            <groupId>org.springframework.boot</groupId>
            <artifactId>spring-boot-starter-amqp</artifactId>
        </dependency>

        <dependency>
            <groupId>org.springframework.boot</groupId>
            <artifactId>spring-boot-starter-test</artifactId>
            <scope>test</scope>
            <exclusions>
                <exclusion>
                    <groupId>org.junit.vintage</groupId>
                    <artifactId>junit-vintage-engine</artifactId>
                </exclusion>
            </exclusions>
        </dependency>
        <dependency>
            <groupId>org.springframework.amqp</groupId>
            <artifactId>spring-rabbit-test</artifactId>
            <scope>test</scope>
        </dependency>
    </dependencies>

    <build>
        <plugins>
            <plugin>
                <groupId>org.springframework.boot</groupId>
                <artifactId>spring-boot-maven-plugin</artifactId>
                <configuration>
                    <source>1.8</source>
                    <target>1.8</target>
                </configuration>
            </plugin>
        </plugins>
    </build>

</project>
메세지 수신자
Message를 주고 받기 위해서 메시지 수신자가 필요하다. 아래 코드는 메세지 수신을 구현한 코드다. RabbitReceiver는 메시지 수신을 구현한 오브젝트다. CountDownLatch는 메시지를 수신했는지 알려주는 역할을 한다.
package com.augustine.spring.rabbit;

import java.util.concurrent.CountDownLatch;

import org.springframework.stereotype.Component;
/**
 * Rabbit receiver component
 * @author augustine
 *
 */
@Component
public class RabbitReceiver {

	private CountDownLatch latch = new CountDownLatch(1);

	public void receiveMessage(String message) {
		System.out.println("Received < " + message + ">");
		latch.countDown();
	}

	public CountDownLatch getLatch() {
		return latch;
	}
}
리스너 등록과 메시지 발신
Spring AMQP의 RabbitTemplate 은 RabbitMQ로 메시지를 주고 받을 때 필요한 모든 것을 제공한다고 생각하면 된다. RabbitMQ를 사용해서 메시지 송수신 어플리케이션을 구현하려면 다음 작업이 필요하다.
-
메시지 리스너 컨테이너 설정
-
queue와 exchange 정의. 그리고 이 둘의 binding(RabbitMQ 콘솔에서 작업)
RabbitMQ 콘솔에서 우리가 만든 Queue 또는 Exchange를 클릭한 다음, Bindings를 보면 To queue 옆에 Binding 할 Queue 이름을 쓰고, Routing Key를 쓴 다음 Bind 버튼을 누르면 된다. Routing Key는 foo.bar.baz 라고 쓰자.

-
리스너에 테스트할 메시지를 보내기 위한 컴포넌트 설정
우리는 메시지를 보내기 위해 RabbitTemplate를 사용할 것이고메시지를 수신할 리스너 컨테이너로 RabbitReceiver를 등록할 것이다. Connection factory는 이 둘을 구동하고 RabbitMQ 서버에 연결하는 역할을 한다.
아래 코드의 main()에서 Spring Boot의 SpringApplication.run() 으로 우리의 어플리케이션을 구동한다. linstenerAdapter() 메소드는 RabbitReceiver 빈을 메시지 리스너로 등록하는 역할을 한다. queue() 와 exchange() 메소드는 우리가 콘솔에서 만든 queue와 exchange 를 생성하는 역할을 한다.
package com.augustine.spring.rabbit;

import org.springframework.amqp.core.Binding;
import org.springframework.amqp.core.BindingBuilder;
import org.springframework.amqp.core.Queue;
import org.springframework.amqp.core.TopicExchange;
import org.springframework.amqp.rabbit.connection.ConnectionFactory;
import org.springframework.amqp.rabbit.listener.SimpleMessageListenerContainer;
import org.springframework.amqp.rabbit.listener.adapter.MessageListenerAdapter;
import org.springframework.boot.SpringApplication;
import org.springframework.boot.autoconfigure.SpringBootApplication;
import org.springframework.context.annotation.Bean;
import org.springframework.context.annotation.Configuration;

@Configuration
@SpringBootApplication
public class MessagingRabbitApplication {

  static final String topicExchangeName = "testExchange";

  static final String queueName = "testQueue";

  @Bean
  Queue queue() {
    return new Queue(queueName, false);
  }

  @Bean
  TopicExchange exchange() {
    return new TopicExchange(topicExchangeName);
  }

  @Bean
  Binding binding(Queue queue, TopicExchange exchange) {
    return BindingBuilder.bind(queue).to(exchange).with("foo.bar.#");
  }

  @Bean
  SimpleMessageListenerContainer container(ConnectionFactory connectionFactory,
      MessageListenerAdapter listenerAdapter) {
    SimpleMessageListenerContainer container = new SimpleMessageListenerContainer();
    container.setConnectionFactory(connectionFactory);
    container.setQueueNames(queueName);
    container.setMessageListener(listenerAdapter);
    return container;
  }

  @Bean
  MessageListenerAdapter listenerAdapter(RabbitReceiver receiver) {
    return new MessageListenerAdapter(receiver, "receiveMessage");
  }

  public static void main(String[] args) throws InterruptedException {
    SpringApplication.run(MessagingRabbitApplication.class, args).close();
  }

}
메시지 발송 테스트
CommandLineRunner 인터페이스를 사용해서 메시지를 발송하는 코드다.
package com.augustine.spring.rabbit;

import java.util.concurrent.TimeUnit;

import org.springframework.amqp.rabbit.core.RabbitTemplate;
import org.springframework.boot.CommandLineRunner;
import org.springframework.stereotype.Component;

@Component
public class RabbitTester implements CommandLineRunner {

	private final RabbitTemplate rabbitTemplate;
	private final RabbitReceiver receiver;

	public RabbitTester(RabbitTemplate rabbitTemplate, RabbitReceiver receiver) {
		super();
		this.rabbitTemplate = rabbitTemplate;
		this.receiver = receiver;
	}

	public void run(String... args) throws Exception {
		System.out.println("Sending message.....");
		//foo.bar.baz 는 rabbitMq에서 메시지를 주고 받기 위한 라우팅키다.
		rabbitTemplate.convertAndSend(MessagingRabbitApplication.topicExchangeName, "foo.bar.baz", "Hello from RabbitMQ!");
		receiver.getLatch().await(10000, TimeUnit.MILLISECONDS);
	}
}
이제 MessagingRabbitApplication 을 실행해보자.
STS cmd 창에 아래와 같은 메시지가 나오고, RabbitMQ 콘솔창에 메시지 그래프가 움직이는 것을 확인할 수 있다.
Sending message.....
Received < Hello from RabbitMQ!>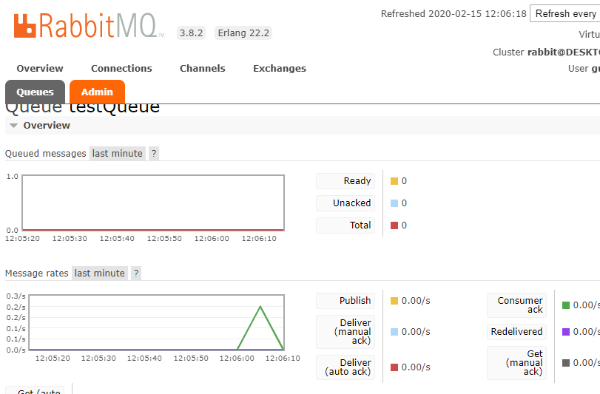
'Tech > Spring' 카테고리의 다른 글
| Intellij spring boot 설정 (0) | 2022.02.08 |
|---|---|
| Spring swagger 적용 (0) | 2021.03.09 |
| 2. Spring RabbitMQ (0) | 2020.02.11 |
| 1. Spring AMQP (0) | 2020.02.11 |
| Spring Boot & H2 DB 를 이용한 CRUD 구현 - 1 (1) | 2019.09.08 |


댓글